Frome Festive Countdown – Homemade Decorations
We’ve got 2 guides for quick and easy homemade decorations. Do them by yourself or get the whole family involved! They’re all pretty slim too, so why not pop one in a Christmas card to your loved ones?
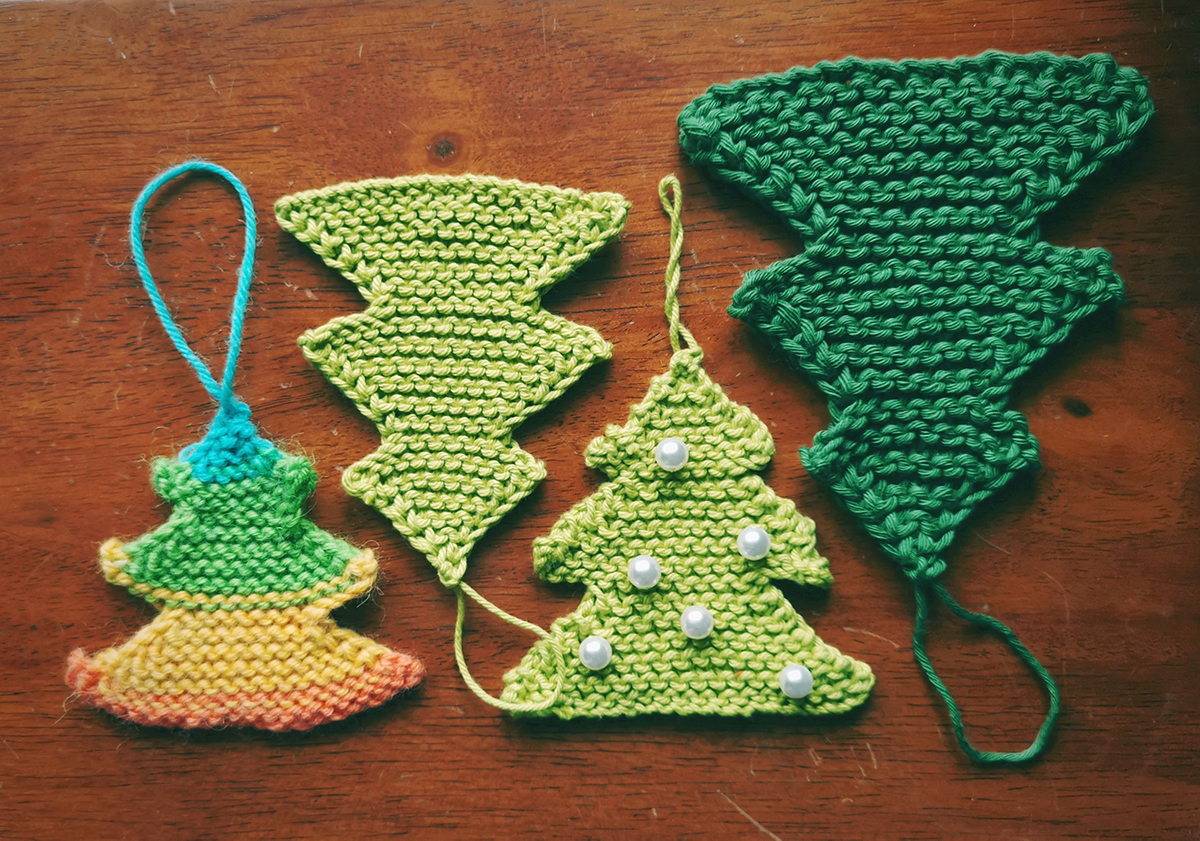
Knitted Christmas Trees
These are really simple to knit and take no time at all. Once you’ve got the hang of it you can knit them up while watching TV or your favourite Christmas movie. You need to know how to cast on (any way), knit (basic garter stitch), knit 2 together, and the e-loop cast on – search for these on YouTube to find video guides.
What You’ll Need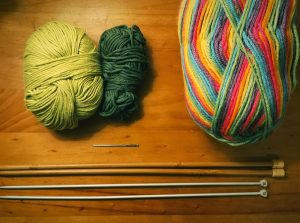

- Any yarn you want to use
- Knitting needles – I recommend using a smaller size than your yarn label recommends. So if your yarn label says to knit with 4mm needles, use 3-3.5mm to give your tree a bit more structure and keep the rows compact
- A darning needle or crochet hook to weave in your ends
- Optional – beads, ribbons etc. to decorate
How to make them
For a nice neat edge, slip the first stitch purlwise on every row except the cast on rows. This is totally optional though – a bumpy edge also looks great for these.
Cast on 21 stitches in whatever method you like
Row 1: Knit every stitch
Rows 2-12: Knit to last 2 stitches, knit 2 together
Row 13: (10 stitches on needle) Knit to last 2 stitches, knit 2 together, cast on 5 stitches using the e-loop cast on
Row 14: Knit to last 2 stitches, knit 2 together, cast on 5 stitches using the e-loop cast on
Rows 15-24: Knit to last 2 stitches, knit 2 together
Row 25: (8 stitches on needle) Knit to last 2 stitches, knit 2 together, cast on 3 stitches using the e-loop cast on
Row 26: Knit to last 2 stitches, knit 2 together, cast on 3 stitches using the e-loop cast on
Rows 27-36: Knit to last 2 stitches, knit 2 together
Row 37: (2 stitches left) Knit 2 together
Cast off leaving a tail about 10cm long. Use the tail to create a hanging loop, and weave in your ends. If you like, you can sew some beads to your tree as baubles or weave some ribbons through it as tinsel.
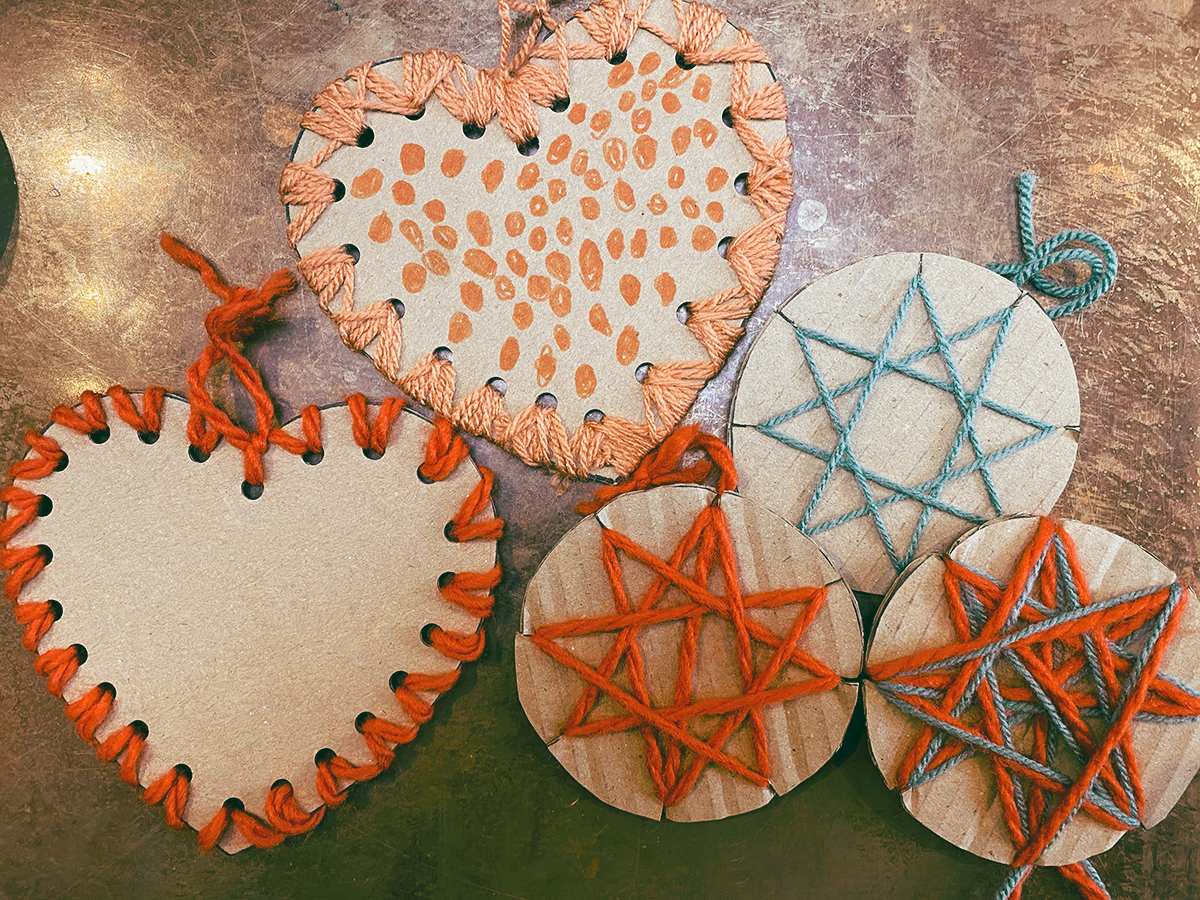
Cardboard decorations
Kids of all ages can take part in making these super easy decorations. Even better, you can recycle some old cardboard boxes and use any scraps of yarn and string you’ve got lying around.
What you’ll need

- Cardboard/card
- Scissors
- Ruler
- Wool or string
- A single or double hole punch
- Pen or pencil
- Tape (optional)
Making the hearts
Draw a heart onto a piece of card or cardboard (you can make a paper template to draw around first) and cut out. Punch holes around the edge of the heart, being careful to not punch too close to the edges. Tie a long piece of yarn through the hole in the top centre of your heart, then start threading your yarn two or three times through each hole until you’re happy with your decoration. You can tie a bit of tape around the end of your yarn to make it easy to thread through the holes. Tie a hanging loop at the top of your decoration and decorate in the middle if you’d like to.
Making the stars
Use a round object like a mug to draw circles on your cardboard and cut out. Make some marks around the edges and snip for the point of your star – you could do 4 points for a diamond up to any number of points you like, but we think 8 looks good. Start to wrap your yarn around in your chosen pattern, and once you’re done tie a loop at the top to hang your decoration. Easy!
Give us a shout by using the #FromeFestiveCountdown hashtag if you share your decorations on social media. Don’t forget to look at the advent calendar activities each day!